
How to Make an Easy DIY Fabric Swag Backdrop
- May 9, 2025
- 2 min read
Looking for a quick and creative way to decorate your space using leftover fabric? This easy DIY fabric swag is perfect for adding texture and charm to your next event, market booth, or photo shoot—and it's a great way to use up extra yardage!
Follow this step-by-step guide to make your own cozy, colorful swag banner.
Materials Needed
Gather your supplies before getting started:
Fabric yardage or large scraps
Rope, twine, or sturdy string
Fabric scissors
Pinking shears (optional)
Iron and spray starch
💡 Tip: Choose a mix of colors, prints, and textures for a more playful look!
Step 1: Choose and Tear Your Fabric
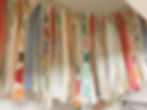
Start by selecting 3–5 fabrics that coordinate well together. For this version, I used a Lori Holt cheater print, a coordinating stripe, a bright gingham, and a soft creamy neutral.
Tear each fabric into strips that are about 1½ to 2 inches wide, going from selvage edge to selvage edge. This will create natural frayed edges and give your swag beautiful texture.
Don’t worry if the strips aren’t perfect—imperfection adds charm!

Step 2: Press and Starch the Strips
Once you’ve torn all your fabric strips, press each one with an iron and a little starch to keep them crisp and smooth. This helps them lay nicely when tied and gives your finished swag a more polished look.

Step 3: Arrange and Tie
Cut a length of rope, twine, or string to your desired swag length. Be sure to leave a little extra on each end for hanging and securing.
Lay out your fabric strips in a repeating pattern, or mix them randomly—it’s up to you!
Then, one by one, tie the fabric strips onto the rope using a simple knot. You can double-knot if you want them extra secure. Keep tying until the rope is filled to your liking.


Step 4: Trim and Finish
Once your strips are all tied on, step back and look at the overall shape. Use pinking shears or fabric scissors to trim the bottom ends of the fabric if needed. You can create a uniform line or leave them uneven for a more relaxed feel.

Step 5: Hang and Enjoy!
Your fabric swag is ready to use! Here are some fun ways to display it:
✔️ As a photo booth or party backdrop
✔️ Behind a market booth or craft fair table
✔️ In a nursery, playroom, or creative studio
✔️ Over a bed, mantel, or window

Wherever it goes, it’s sure to add charm and a touch of handmade personality!

This fabric swag is simple, satisfying, and completely customizable. Tear, tie, trim—it’s that easy! Mix prints, play with patterns, and make it your own. Once you make one, you’ll be looking for more reasons to use up your favorite fabrics.
📌 Love this project? Pin it for later!💬 Made your own swag? Tag @AuntHenri on all socials—we’d love to see how it turned out!
Happy Crafting,
Aunt Henri 🧵